Tag Archives: Easy Crafts

Last updated by at .

How to Make: Fun and Easy Homemade Valentines

Since Roman times, people have celebrated a mid-February festival — once called Lupercalia and celebrating fertility, the holiday was changed by Pope Gelasius in 496 A.D. into a Christian feast day in honor of the Roman martyr Saint Valentine. Today, 25% of all cards sent in the U.S. per year are valentines.

And why not? In addition to proclaiming love, valentines can be lovely, bright, traditional, and endless in variety. As such, they make a wonderful craft for children, who can easily decorate large paper hearts with simple things found in grocery and craft stores and around your house.

You’ll need:

Construction paper in classic Valentine colors (red, pink, purple) — or not!

At least one good heart-shaped template, made of cardboard, that you can trace around to make valentine hearts. (Sometimes these can be found in craft stores.)

Scissors, regular and/or pinking edged

Glue, traditional and stick

Paper doilies that are slightly larger than the heart-shape


To decorate your valentine hearts, choose from:

Smaller doilies, either whole or cut
Commercial valentines, either whole or cut
Stickers (old-fashioned valentine or floral themes, or any of your choosing)
Small pom poms
Ribbon pieces
Small paper cups for candies or baked goods (available at specialty or grocery stores)
Small paper hearts
Feathers
Buttons
Beads
Tissue paper shreds
Crinkle cut paper
Pipe cleaners
Party napkins, whole or cut up
Felt hearts
Foam hearts and other shapes
Fabric scraps
Crepe paper pieces
Glitter
Markers, to write messages
Paint

The list is endless! We collect valentine items from year to year and store them away when not in use. Most of these things are available in craft and similar stores. Younger children, especially, seem to like the really tactile items like pom poms, feathers and candy cups.

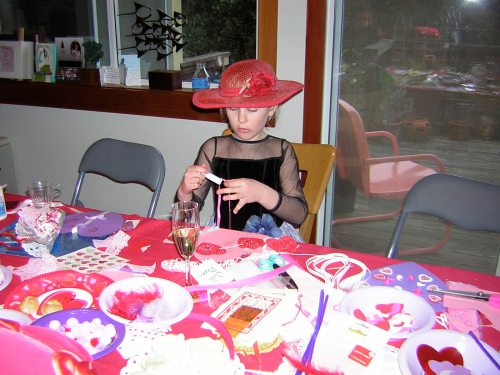
It’s easy to host a small or large group to make valentines. Try putting each item in its own small bowl. Or have guests dress up or wear hats for a Valentines Tea that includes mini sandwiches and juice or tea in teacups. (Second-hand stores are a good source of old teacups.)

Happy Valentine’s Day!

Photos by Susan Sachs Lipman

You might also like:

Host a Valentine Tea Party

Mixed Reviews for New Necco Sweetheart Flavors

Build Your Dream Gingerbread House Part One

It’s the rare person whose imagination isn’t captured by the delight in creating a gingerbread house. There’s the architecture aspect, as the house’s pieces are baked and fitted — and icing-caulked — together in a variety of ways. There’s the decorating, which can be done with all manner of bright candies and objects and patterns that can recall familiar items — or not! And there’s the very satisfying, whimsical, one-of-a-kind structure that results.

Here are some tips and ideas from around the web for creating gingerbread and other candied houses.

From Wilton, comes this extremely informative and creative guide to decorating gingerbread houses that covers multiple styles.

Celebrating Christmas offers recipes, ideas, and enough blueprints for homes and landscaping (from ponds to flower-lined paths) to satisfy your inner general contractor.

Gingerbread House Heaven is another site with lots of ideas and beautiful pictures for inspiration. Think you can’t light a gingerbread house with real lights, for instance? Think again. This site shares how, in addition to offering instructions for melted-candy windows that will make the light glow realistically through. Roofing textures and various recipes for edible clay are among the many other things covered.

If you’re still seeking good gingerbread recipes and building how-tos, Simply Recipes has plenty.

Rather skip the headaches of building and just move in? Here are lots of turn-key house ideas, like using milk cartons or other bases, as a way of getting right to the decorating fun.

With small children, especially, the easiest and most pleasing thing to do is cover a short milk carton with frosting and let them stick on candies and other foods to decorate. The milk carton (or a village of them) can sit atop a piece of foil-covered cardboard that can also be frosted. And, of course, you can buy a pre-assembled gingerbread house and get right to the decorating.

Some decorating ideas include:

Gumdrops, cut in half – edging or decorations
Jelly beans – edging or decorations
M&Ms – ornaments or decorations
Fruit loops – decorations
Nilla wafers, crushed or whole – walkways
Ritz crackers – walkways, shingles or siding
Gummi bears – decorations
Chocolate soldiers – decorations
Chocolate kisses – bells or decorations
Chocolate nonpareils – shingles or decorations
Candy canes – gates or decorations
Licorice, small pieces – edging or bricks
Necco wafers, whole or broken – shingles, walkways, decorations
Pretzel sticks – fences and logs
Shredded wheat cereal – thatched roofs
Graham crackers, halved, and candy canes – sleds
Graham crackers – shingles
Upside down ice-cream cones, frosted and dipped in green sprinkles – trees
Brown sugar – dirt
Confectioners sugar – snow

And, for the modern home, orange-half barbecues and ice-cream cone satellite dishes!

Here’s hoping you enjoy a fun and creative holiday!

Photos: Public Domain, Wilton, Susan Sachs Lipman

Stay tuned for Part Two: Gingerbread Workshops

Felt a Bar of Soap

The act of “felting” anything, particularly a bar of soap, is completely satisfying to the senses. The combination of soft wool and gentle lather is very pleasing, as is the process of shaping the felt over the soap.  If you’re using a scented soap, your sense of smell will be rewarded as well.

Why felt a bar of soap? Besides providing a fun, easy family activity, your felt bar acts as a washcloth and soap in one — the felt tightens as the soap shrinks with use. Felted soaps also make lovely gifts.

You will need:

A bar of soap (Most solid soaps will felt well. Goat’s milk soap, in a scent like lavender, is especially nice. Ivory soap will work as well. Soaps with rounded corners are preferred.)

Wool roving, available at craft, knitting and specialty stores. (The main color should be about 1 1/3 times the area of the bar of soap, with other small amounts of roving for accent colors.)

Two towels

A dish of warm water or a sink

A raised screen, or other drying surface, if you have one

Wrap your main piece of roving loosely around the bar of soap, lengthwise and widthwise, so that the entire surface of the soap is  covered in a loose-fitting package. Be sure to leave extra wool at the corners of the soap.

Wrap accent threads around the package in any design you’d like. (The design will change somewhat, as threads will shift in the process.)

Drizzle with warm water, either from a bowl or at the sink, enough to barely wet most of the bar.

Begin to mold the package with your hands. The soap will start to lather.

Keep forming and molding the felt to the soap bar, making sure to work the various surfaces evenly. The felt may appear wrinkly and loose. You may need to scrape away excess lather with your hands.

Occasionally squeeze with a towel to release excess moisture. You may even want to let the bar sit on a towel for a few minutes.

Continue to rub in your hands, turning the soap over and evenly smoothing the various surfaces. Be careful to keep the corners covered. The felt should begin to adhere more tightly to the soap.

When you are satisfied that the felt has tightened over the soap, wipe the excess lather off. Briefly run cold water over the soap to further tighten the fibers.

Let the soap dry for approximately 24 hours on a towel or on a screen, if you have one.

Enjoy your unique felted soap.

Here is a felt soap that Anna created:

Photos by Anna and Suz Lipman

Related Posts Plugin for WordPress, Blogger...