Category Archives: Deck Garden

Make a Quick and Easy Valentine Bird Feeder

Sometimes we forget to feed birds and other wildlife in the winter, which can be precisely when they need it the most because it’s less plentiful in the environment. Why not show a little love by making valentine bird feeders? This very easy project will have you backyard bird-watching in no time. Experiment with different kinds of seeds to see which birds each attracts. Or ask for advice at a plant nursery or pet store. Oil sunflower is a particularly nutritious winter seed that a lot of birds like.

You’ll need:

Cardboard
Heart template, optional
2-3 ‘ ribbon or string
½ cup vegetable shortening, peanut or other nut butter, suet or lard (plus, cornmeal or oatmeal, optional)
2 ½ cup mixture of birdseed (chopped nuts, dried fruit, optional)
Small mixing bowl
Plate, shallow dish or pie tin
Scissors
Spoon or butter knife

Cut a heart out of cardboard, using a template or free-hand.

Poke a hole toward the top and run the string through it. (If using a ribbon, you might want to string it after the mixture has dried a little, using a hole to poke through the hole, as needed.

In mixing bowl, combine peanut butter or other spread with meal, if using.

Spread that mixture over the both sides of the heart with the knife or spoon.

Pour the birdseed and feed ingredients onto the plate.

Place the heart into the seeds.

Hang your valentine from a tree branch or window eave that offers some shelter from wind and weather if possible, as well as a view of visiting birds!

Slow Tip: You can make these with pinecones in the fall. Or use a toilet-paper tube anytime, and either string it up or place it right onto a branch.

Photo by Susan Sachs Lipman

Join Project Feeder Watch and Other Fun Citizen Science Activities

Do you have enjoy observing nature and have 15 minutes to spare? If so, you can be a citizen scientist. Over the past few years, citizen science has really taken off, allowing ordinary people to help scientists and organizations track the count and behaviors of birds, butterflies, bats, bees, wildflowers, weather and celestial phenomena, and much more. After all, researchers can’t be everywhere, and many of us have habitats in our backyards and neighborhoods that can help others gain important information about nature.

And, if that isn’t enough, citizen science makes a fun family or classroom activity, getting naturalists of all ages and abilities  outdoors together and providing them with something to do and a way to feel helpful and a part of the Earth’s larger ecosystem. Don’t let the name intimidate you. All you need to participate in citizen science is the desire to observe nature to the best of your ability for a period of time and record what you see.

There are multiple projects to engage citizen scientists, year-round and covering multiple interests. Cornell’s Project Feeder Watch starts November 10 and runs through early April.

These are just a few of the other wonderful citizen science projects that can use your help:
Western Monarch Thanksgiving Count
The Great Backyard Bird Count
Great Sunflower Project
Acoustic Bat Monitoring
Ice Watch
Monarch Watch
Firefly Watch
NOAA Weather Observer Program
Project Budburst
National Wildlife Federation‘s Wildlife Watch
NASA Meteor Count
Snow Tweets
Hummingbird Migration Map


Still looking for more fun citizen science projects? Check out SciStarter or Cornell’s Citizen Science Central.

You might also enjoy:

Join the Great Sunflower Project

Have Fun Attracting and Helping Bees, Butterflies and Birds

2010 Great Backyard Bird Count

Photos: Owl Butterfly, Susan Sachs Lipman; European Starling and Northern Flicker, Pam Koch; Bee on Sunflower, Susan Sachs Lipman

Stir up Some Triple Berry Jam

Canning has made a big comeback in recent years. For good reason— it’s a fun, easy, and economical family or group activity that even offers some kitchen science, as you watch the mixture transform from liquid to gel. Canning is productive too, and you can’t help but feel good when you see the bumper crop of jars filled with jewel- colored jam or other goodies that you’ll be able to give as gifts or eat all year long.

Anna started making jam with me the summer she was three years old. We had a favorite blueberry farm, about an hour from our house, and we began to travel there each summer during the extremely short (about two- week) blueberry season, to collect ripe berries and sit at a small counter to enjoy the freshest blueberry ice cream imaginable. If you are fortunate to have berries available, now is the time to make jam. Versions of this recipe can be made with many fruits. Consult pectin packaging or canning books or sites for recipe proportions.


You can make excellent jam from most fruits and berries. Because Michael is from Pennsylvania blueberry country, I absorbed his love of blueberry jam, which can be phenomenal and offers a strong taste of sunny summer in the depths of midwinter when you spread just a little on toast. Raspberry jam is wonderful to use in holiday cookies and tarts. Peaches and apricots are also
fun to work with and make excellent jams and chutneys. The jam we turn to most often, though, is the rich, complicated, and flavorful triple- berry jam.

You’ll need:

• Canning jars, half-pint size preferable (available in supermarkets
and hardware and drugstores—you shouldn’t use
old household jars, as they might be scratched)
• New canning lids and new or used bands
• Wide- mouth funnel and jar lifter (available at many
hardware and drugstores)
• Ladle and tongs
• Pot holders, dish towels or cloths, and sponge
• Mixing bowls
• Wooden spoons
• Heavy- bottomed pot for cooking
• Very large pot or canner that includes an inch of water
above the jars and plenty of room for the water to boil, and
a jar rack or cake- cooling rack
• 5 cups strawberries, raspberries, and blackberries (3
pints strawberries, 1 1/2 pints raspberries, and 1 pint
blackberries) at peak ripeness, chopped (with knife or food
processor, see below)
• 7 cups sugar
• 1 box dry pectin

Wash the jars, bands, and lids in soapy water.

Place the bands and lids in a saucepan and simmer for five minutes, without boiling. Turn off heat and leave them in the hot water until ready to use.

Place rack into the pot and place jars on the rack (to prevent them from breaking in the pot). Fill the pot with water to an inch above the jars. Bring the water to a boil and keep the jars in a rolling-boil bath for ten minutes. After that, they sit until ready to be used.

Chop the berries by hand or in a food processor. If using a processor, pulse the berries in small batches so you end up with fruit bits rather than a puree.

Measure sugar into mixing bowl.

Add berries and pectin to the heavy-bottomed pot and mix.

Bring to a full rolling boil over high heat, stirring constantly.

Quickly add sugar and continue to stir. Return to a full rolling boil. Then boil, stirring, for one minute.

Remove from the heat and skim off any foam with a ladle.

Remove the jars from their bath with tongs and a pot holder, and place them upright on a dish towel. Ladle the jam mixture into the jars, leaving 1/4of air, or headspace. Wipe the rims and threads with a wet cloth. Top with lids and screw on the bands.

Place the jam-filled jars back into the canning pot, and boil again for ten minutes to process, or additionally sterilize, them.

With certain vegetables and meats, the sterilization process is especially crucial to prevent food poisoning. Although the trend has moved away from the necessity of processing most fruit

jams, and just leaving them standing when filled, I still like to boil them a second time, the old-fashioned way.

Let filled and processed jars stand for approximately 24 hours at room temperature. Do not retighten the bands.

You know you have a good seal when you push on the lid and it doesn’t pop back. If the seal is not good, the jam can be stored in the refrigerator for three weeks. Otherwise, it can be stored in a cool, dark place for up to two years.

Label with the date and type of jam, particularly if you plan to make more.

Yield: Approximately 5 half pints.

Note: It’s important to understand and follow food canning safety guidelines.

Another Note: Thank you Joyce for writing about Fed Up with Frenzy on Baby Center! And thank you for your reminder about low-sugar jam. I do feature low-sugar alternatives in my book. Here is an excerpt:

There are lots of ways to make jam with reduced or alternative sugar. One way is to cut out the pectin, reduce sugar by about 1/3,  and boil the jam for 10-15 minutes until it reaches the jell point on its own. Another is to use a low-methoxyl pectin, such as Pomona’s, available at natural food stores. Jam made this way tastes terrific. This recipe makes berry jam.

You’ll need:

• 4 cups mashed berries
• ¼ cups lemon juice
• ½ – 1 cups. honey OR
• ¼ – 2 cup sugar

Low methoxyl pectin and calcium water, per package instructions.

Photos by Susan Sachs Lipman

Adapted from Fed Up with Frenzy: Slow Parenting in a Fast-Moving World, by Susan Sachs Lipman.

Other posts by Suz you might like:

The Bond of Blueberry Jam, Motherlode blog

Bake an Old Fashioned Blueberry Buckle

Blueberry Tuesday: Summer  Triple Berry Crisp


‘Fed Up with Frenzy’ Blog Tour Coming to a Screen Near You


As many of you know, my book, Fed Up with Frenzy: Slow Parenting in a Fast-Moving World, will be out August 1.

I am very eager for you to learn about all the fun ideas and projects I’ve collected to help your family slow down and reconnect. To do that, I’ve assembled an all-star team of bloggers to join the Fed Up with Frenzy Blog Tour to share their thoughts about the book and some of the ideas and projects inside.


Here is a partial list of bloggers and dates on the Fed Up with Frenzy Blog Tour. Please visit their sites for reviews, activities, tips and book giveaways! (And also, because they’re all wonderful sites with great information about kids, crafts, gardening, nature, free play, education, slowing down, creativity and family fun!)

August 1                                      Power of Slow     Review

August 2                                     Grass Stain Guru     Guest post

August 4                                       Exploring Portland’s Natural Areas Review

August 7                                     Red, White & Grew     Guest post

August 9                                     Slow Family Living     Review/Activity

August 15                                     Fun Orange County Parks     Review

August 17                                      Let Children Play     Guest post

August 22                                     Jen Spends     Review

August 24                                     Becentsable     Review

August 27                                     Real Moms Love to Eat     Recipe

August 28                                     A Place Like This     Review

September 5                              Rhythm of the Home     Guest post

September 5                               Mummy’s Product Reviews     Review

September 6                               Jump into a Book     Review

September 6                               Modern Day Moms     Review

September 7                               7 on a Shoestring     Review

September 8                             Dad of Divas     Review

September 10                            Go Explore Nature     Interview

September 12                           Active Kids Club     Podcast!

September 13                            Love, Life, Family and Then Some     Review

September 14                            Go Explore Nature     Activity

September 14                           Adventures of the Alpha Mom     Review

September 15                            What Mama Wants     Review

September 18                            Traveling Mel     Review/Activity

September 19                            Allison Abramson     Review

September 20                           Imagination Soup      Review

September 21                          Chi-Town Cheapskate     Review

September 21                          Frugal Mama     Review

September 24                          Go Gingham     Review

September 24                         Adventures of the Alpha Wife     Review

September 25                          Play Equals Peace     Interview

September 26                          A Little Yumminess     Review/Recipe

September 27                          Bright Copper Kettles     Review/Craft

September 28                          Parent Palace     Review

October 1                                   Noble Mother     Review

October 2                                   Frugal Mama   Guest post

October 3                                   A Little Bite of Life     Review

October 4-18                           The WELL Inkwell     Online Discussion

October 8                                  Love, Live, Grow     Review

October 12                                 Skinny Mom     Review

October 15-24                         Erin Goodman     10-day Family Recharge

October 17                                 Erin Goodman     Review

October 20                               I’m a Teacher, Get me Outside Here   Review

November 14                          Mama Scout     Review

November 15                          Frog Mom Blog     Review and Activity

November 27                          Salt and Nectar     Web chat

December 4                     Bliss Beyond Naptime  Audio, Frenzy-Free Holiday
Plus Video, Simplicity Parenting with Rhythm

December 7                      Polliwog on Safari     Review

January 3                          Non-Toxic Kids     Review

July 27                                Hill Babies     Review

Dates To Be Announced (this site will update):

Life as Mom

Nature Moms

Ask a Nanny

The Movement Academy Project

Connecting Family and Seoul

Would you like to join the blog tour? Please give me a shout. I’d be thrilled to have you join.

Blog tour badge by my talented husband, and the book’s illustrator, Lippy.

Spring at the Bird Café and Bird Feeder Activity

We’ve had some lovely birds greet us this spring, more than in recent memory. They feast on our seed — bars of Birdola songbird and gold finch feed that fit in a wire-cage bird feeder (though you can make your own feed, too. A recipe follows.)

Our visitors this year include the blue Western Scrub-Jay, the very cheery House Finch, and a young Titmouse. Which creatures are visiting you?

This is a really easy bird feeder to make:

Pinecone Bird Feeder

You’ll need:
• Pinecone (you can substitute a toilet-paper tube)
• 2′–3′ of string
• 1/2 cup vegetable shortening, peanut or other nut butter, suet, or lard
• 1/4 cup cornmeal or oatmeal
• 2 1/2 cups mixture of birdseed (e.g., sunflower and millet; check your local  nursery for suggestions), chopped nuts, and dried fruit
• Mixing bowl
• Plate, shallow dish, or pie tin
• Spoon or butter knife

Tie the string around one end of the pinecone.
In mixing bowl, combine peanut butter or other spread with meal.
Spread that mixture over the pinecone with the knife or spoon.
Pour the birdseed and feed ingredients onto the plate. Roll the pinecone in the seeds.
Hang from a tree branch or window eave.

Photos: Susan Sachs Lipman


6 Fun Family Activities to Enjoy This Weekend

For many, Memorial Day Weekend signifies the beginning of the summer season and a return to outdoor fun. Here are a few great activities that will help you make the most of it.

Make and Fly a Popsicle Stick Airplane

Everyone loves to make and fly airplanes, and the rounded popsicle-stick ends on these make for a fairly safe, satisfying, and easily assembled flying machine.

You’ll need: 5 popsicle or craft sticks per plane.

Stack three popsicle sticks and then fan them out so that one end of each stick is still touching the others. Glue the tops together. Weave a fourth popsicle stick over the first stick, under the middle stick, and over the third stick in the triangle. Weave a fifth popsicle stick the opposite way—under the first stick, over the middle stick, and under the third stick in the triangle. If desired, add a dot of glue at each juncture for extra security, and let the glue dry. Paint your airplane or leave it natural. Take it outside and fly as you would a paper airplane. Hold the middle stick and try to launch it decisively and parallel to the ground.

Camp in Your Backyard

Camping out in sleeping bags is fun any time of year—in a backyard, on a porch or balcony, even on the living-room floor. Play low-tech games, like cards and charades. Make traditional camp treats, like s’mores. If you’re outside, enjoy a game of flashlight tag, played by tagging players with beams of light.

Make Patriotic Cookies

These red, white and blue cookies are festive and fun to make anytime. Enjoy the creative process and enjoy the response when you bring them to a party or potluck. In addition, they taste particularly yummy!

Paint and Plant a Flower Pot

Looking for a simple garden project or a teacher or other gift? Paint a clay flower pot with tempera paint. Let it dry, fill with dirt, and plant your favorite plant or seed inside. You can also cover a pot with seed packets or other paper products and attach them with adhesive material, such as Mod Podge.

Get Your Garden Growing

Memorial Day Weekend can be a great one to get into the garden. There are fun gardening projects to interest every age gardener and lots of easy ways to get a garden started, even if you’ve never been much of a green thumb.

Play an Old-Fashioned Outdoor Game

Will you be with a group of people over the weekend? Get outside and play an old-fashioned game, like Hide and Seek, Duck Duck Goose or Tag. Or play Pickup Sticks with real twigs!

You’ll need: Approximately 41 twigs.

Hold the twigs in a bundle, then release them so that they land in a pile. Players take turns trying to remove one stick at a time, without disturbing any other sticks. When a stick from the pile is disturbed, the next player takes a turn. Some players use a designated stick to remove other sticks. When all the sticks have been removed from the pile, players total their numbers of sticks to determine the winner.

Enjoy your weekend!

Photos: Susan Sachs Lipman, VA State Parks

Earth Day and Every Day: 11 Ways to Make Gardening Extra Fun for Kids

With Earth Day upon us, not to mention the warmer and longer spring days, many of us have been heading into our gardens. Around much of the Northern Hemisphere, this is the peak time to sow some seeds into the ground, as well as plant a lifelong gardening habit into the children in our lives.

Gardening helps families spend time together outdoors, take pride in growing our own food, and connect to others who have lived on the land before us. Even though gardening offers a bounty of simple wonder, beauty and fun for even the smallest children, it doesn’t hurt to employ a few methods for getting and keeping them especially engaged.

Here are some simple ways to maximize your child’s interest in the garden.

Let children select some plants they want to grow. Something magical happens when one has ownership of a project from its initial stages. When choosing plants, check that you have the right growing conditions for them to help ensure a successful experience. Planting information is available on seed packets and through garden-supply store folks, who are generally very helpful. You can choose seeds, young seedlings, or a combination of the two. Seeds are more cost-effective and can be especially rewarding and wondrous. Bedding plants of course give your garden instant color.

Some plants that come up quickly, and are easy to plant and grow, include nasturtiums, peas, sunflowers and beans.

(As an aside, my daughter always chose marigolds to plant, just like I did I when I was a kid. They’re so colorful and cheery and happen to be easy to grow from seedlings or seeds. Perhaps many children are drawn to bright marigolds.)

Chop chores into small blocks. Kids can lose interest if the project seems daunting. Try to break up the tasks into doable chunks and over more than one session if necessary.

Make a sign that identifies the garden, area, or container as the child’s. The sign can be as simple as a painted rock or as ambitious as a mosaic-tile kit from an art-supply store. If other people are sharing the garden, you can still identify different children’s plantings by putting each name on a wooden stick (available in bags at garden-supply stores) in permanent ink.

Create a fun space in the garden. Create a hiding place with trellises or plantings, or plant a sunflower house by planting sunflowers in the shape of a large playhouse that you can later go inside. (Leave room for your door!) Designate a tree stump to serve as a table for tea parties, or decorate an area with whimsical objects you make or find. For instance, use pipe cleaners and beads to make simple butterflies, ladybugs, mushrooms and flowers, and then place them among the plants. Or plant a pizza garden! Grow tomatoes, peppers, eggplants, basil and more in the shape of a pizza. At harvest time, add dough and cheese and bake your creation.

Attract animals to your garden. Certain plants and flowers are known to attract various butterflies and birds. This can add another level of delight for children. The National Wildlife Federation has information about how to turn any garden into a habitat for wildlife. Even if you don’t get your garden “wildlife” certified, there are a lot of fun, helpful tips for bringing creatures into your yard.

Let your child plant. In addition to helping children feel ownership of the garden, the act of putting seeds into the ground and then watching them come up is great fun. Large seeds like nasturtium, peas, beans, sunflowers, and gourds can be especially easy for children to handle and poke into holes. Smaller seeds can be mixed with coffee grounds for scattering. You can usually tell the relative size of a seed by shaking the seed packet.

Let your child water. Most children love to water. Teach them to check the soil by poking a finger down a couple of inches. If they feel moistness, there’s no need to water. If it’s dry, the plant is thirsty. It’s also best to water early or late in the day, so that the water doesn’t dry out in the sun before getting to the roots of the plants. Water fairly deeply and try to get the water into the dirt instead of right on the plants, where it can damage leaves and stems.

Let your child harvest. Children also love to harvest what they’ve grown. Be sure to have them experience picking their own vegetables or flowers (with you helping to cut stems, as necessary.) Cooking or baking with the food you’ve grown is, of course, a delight. Strawberries are really fun to grow and eat right in the garden — I’ve had the best luck with young plants rather than seeds. Catnip is fun to grow if you have an appreciative cat. And flowers are fun to give others on Earth Day, May Day or anytime.

Avoid the use of pesticides in any garden that you’ll be eating from, or even spending time in. If your garden does develop an unwanted species, take an affected piece of the plant to your local garden-supply store and ask for advice on how to treat it organically.

Let the diggers dig. Some children prove especially interested in what’s under the ground. For them, an area in which to dig and look at worms and other creatures may be ideal.

(Relatedly, when my daughter’s wonderful pre-school learned they were going to have new-home construction occur next door, they cut a hole in the fence and covered it with plexiglass. A whole group of kids regularly watched the bulldozers and other tools of construction with fascination. In other words, it’s good to remember that kids aren’t necessarily interested in the same things we are.)

Allow for mistakes and experimentation. Children can learn early that things don’t always grow as planned. Likewise, gardens can be wonderful places to explore, experiment, and observe. Try planting the same plant in different conditions, or grow something you’ve never grown, just to see what happens.

Photos by Susan Sachs Lipman

You might also be interested in: Earth Day and Every Day: Beginners Guide to Getting Your Garden Growing

Happy Earth Day: Beginner’s Guide to Getting Your Garden Growing

It’s Earth Day, a few weeks into Spring in the Northern hemisphere, and no time like the present to get your garden going — even if (and perhaps especially if) you’re a total gardening novice.

Fear not. Even if you’ve never grown so much as a pansy, the following steps will get you and your garden up and running.

Select your site. 6-8 hours of full sun per day is ideal. If you don’t have that, be sure to buy crops specifically intended to grow in the shade. (These include coneflowers, impatiens, lupine, nasturtiums, snapdragons, beans, beets, broccoli, lettuce, peas, and spinach.) If you don’t have adequate flat space, explore other outdoor space like patios, pass-throughs, or decks. We’ve grown corn, pumpkins, sunflowers, and more on a deck. Don’t forget to think vertically, too — Plant in large boxes and have plants climb up trellises, which many love to do.

Your space needn’t be too large. A 10×10 foot plot can support a few rows of different crops. Often gardeners get overly ambitious and plant more than they can reasonably maintain. If your site is traveled by munching animals, such as deer, you will want to construct some kind of fence around it.

Get comfortable. There are lots of items available to make gardening more comfortable. I suggest knee pads, if you’re going to be doing a lot of kneeling, a sun hat to protect your skin, and old shoes you don’t mind getting dirty or gardening clogs made specifically to get wet and dirty. (A pair of gardening clogs lasts for years. They’re also very comfortable and you can leave them outside.) Most people like gardening gloves and there are a range of them on the market. I find them irresistible to buy at gardening and hardware stores, with their cute patterns, but I almost always end up taking them off and getting my hands really dirty — the better to feel the plants, the dirt, and what I’m doing.

Prepare the soil. Use a pitchfork to loosen the ground, preferably down to about 8 inches. Clear the surface with a heavy-duty rake. Break up dirt clods and pull weeds. (These can be added to a compost, if you’re composting.) If you wish, you can buy packaged soil for a nice even top layer that will have some nutrients in it, especially if you suspect your soil is poor. (Take a sample into your local garden-supply store for an opinion.) Either way, some sort of packaged fertilizer should be added as well. A general mix for new plantings is usually good, but the folks at the garden center may have more specific advice based on your soil and what you’d like to grow, as well as how much organic matter you want to add. Always water thoroughly before adding fertilizer. (And have kids wash hands after handling.)

If possible, plan some paths in your garden. They will make it easy to water, weed, and harvest without stepping on plants. Some people cover the paths with tanbark or other material (available at garden-supply stores) to mark them and to discourage plants from taking root there. Make sure you have a good path for your hose and a water source.

Plant the seeds or seedlings. For most people, this part is especially fun. Follow the packet instructions for seed spacing and conditions. You may want to lay a line of string as a guide, or create a shallow furrow in the dirt with a spade. Some stores carry seed tapes, which you just lay down in a straight row. Tapes are great for tiny hard-to-handle seeds like carrots, which can be difficult, even for adults. Large, easy-to-plant and -grow seeds include nasturtium and pea. If you’re planting bedding plants, be sure to give each lots of room to spread out and grow. Try to anticipate the heights of your plants to get the tallest ones into the back. And don’t forget to grow something that you’d like to see or eat!

Fertilize. If you didn’t add fertilizer to the bed while preparing the soil, add a little bit while planting. There are fertilizers on the market that are designed specifically for new growth. And there are many organic fertilizers available, which is optimal if you’re growing food. Ask the folks at your local garden center to help you choose one for your garden and conditions. Many people fertilize plants again at about six weeks into the growing process.

If you are gardening in containers, get the biggest containers you have space and money for. Check for adequate drainage holes. If you don’t have good drainage, you can add netting or pieces of broken pottery to the bottom of the pot. You may also want to add perlite, which will aerate the soil while helping it retain moisture. Fertilize as you would in a garden plot.

Water your plants or seeds. New transplants and freshly planted seeds like lots of water. The best kind of watering is done gently and deeply, so that the water soaks through to the growing roots of the plants. Once your plants are established, you will probably need to water every other day or so when the weather is sunny. (Plants in containers usually need water more often than plants in the ground.) If a plant droops during the day, or the soil feels dry more than a couple of inches down, it needs water. Try not to water in bright sunshine because the sun can evaporate the water or even cause burned spots on the plants.

Keep up the good work. Continue watering and caring for plants as needed. This can include pulling out obvious weeds and cutting back any growth that has died or become unattractive.

Harvest what you’ve grown. Sometimes I’ve been so proud of my work and/or not sure when to harvest that I’ve let plants go past the point when they’re edible or useful and all the way to seed. Take a chance and cut and enjoy what you’ve done. More will usually grow back!

Have fun entering one of the oldest and most rewarding hobbies around!

Photos by Susan Sachs Lipman

You may also be interested in Earth Day and Every Day: How to Make Gardening Extra Fun for Kids

Tulipmania 2012

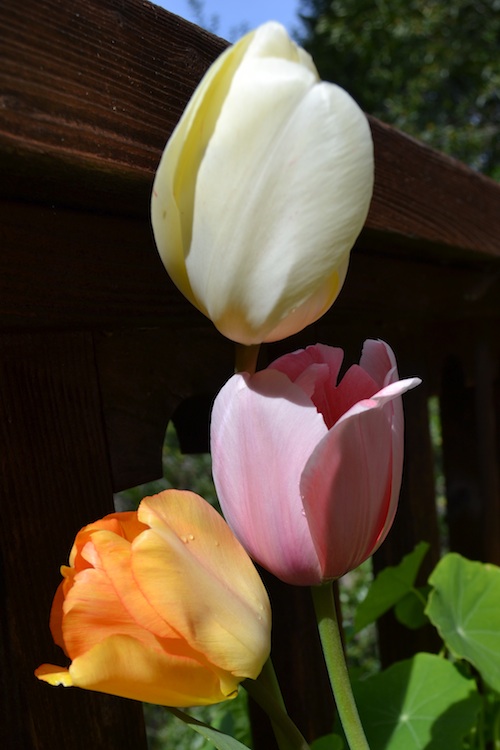
Like the 17th-century Dutch who experienced one of the biggest boom-and-bust cycles in history, my family and I find ourselves gripped by Tulipmania each year. We pore over photos of tulips on the Internet and at our local garden center and ultimately choose a few for reasons that vary widely each year — a lovely pale shade here, a bright color there, a curve of shape or a frill of petal.

Whichever types you choose, planting tulips is a terrific family project that brings you a lot of beauty and wonder for relatively little effort. For more information about planting, see Tulips are in the Ground. Here are this year’s tulips:

Salmon Impression

We chose Salmon Impression for its wonderful pastel color, and it didn’t disappoint. This variety yielded beautiful large flowers on strong, tall (20-24″) stems. I especially enjoyed the subtle green coloring on each petal.

Ivory Floradale

Another gorgeous flower (and another Darwin Hybrid type), the Ivory Floradale came in colors ranging from yellow to cream. They also produced a large and interesting flower on a sturdy 20-22″ stem.

DAYDream

A favorite from years past, the Daydream continued to delight again and was a great compliment and accent to the other colors and varieties. Another sturdy flower on a 20-24″ stem, this Darwin Hybrid produced a bright, apricot color and dark centers that were revealed when the petals opened in the sun.

china town

Our last flower, China Town, looked like a lot of fun, with its frilly, multi-colored petals, but, alas, the bulbs went into the ground and failed to grow. Luckily they were in a separate container, so that our bright display bloomed in a happy group.

As always, we treasured our tulips while they were here. Until next year!

Photos by Susan Sachs Lipman

More Tulipmania from Slow Family:

Tulipmania 2010, Part One (Lots of tulip photos)
Tulipmania 2010, Part Two (More tulip photos)
Tulipmania: One Bubble I can Really Get Behind
Tulips are in the Ground

Enter the “First Peas to the Table” Pea Growing Contest

Each Spring, in the colonial U.S., founding father and extraordinary gardener Thomas Jefferson held a friendly contest with his neighbors to see who could grow the most peas. The first person to grow a bowl of peas was declared the contest’s winner and hosted a dinner for the other neighbors.

Now a children’s book and a school contest celebrates this tradition. First Peas to the Table: How Thomas Jefferson Inspired a School Garden, by Susan Grigsby and Nicole Tadgell, illustrates the life cycle of peas, while taking readers through a friendly modern-day competition modeled on Jefferson’s.

There is also an accompanying pea growing contest that encourages children in grades 1-4, growing individually or in teams, to be the first in their USDA Hardiness Zone to harvest 2 or more cups of peas. The contest opens March 1, with different end dates, based on Hardiness Zone. The First Peas Contest web site has all the contest rules, as well as links to lots of growing tips and information. Winners in each gardening zone will receive a set of four garden-themed books and will be featured on the Albert Whitman Publishers web site.

Since my foggy Bay Area, CA, climate is uniquely suited for peas, and we’ve grown more than our share of them, we’re eager to grow along with the contest and see how we do. (We usually grow peas in the Summer or Fall, so March planting is new for us.)

Before planting, we soaked our pea seeds in warm water for 24 hours, which should give them a good start on sprouting. (This works especially well with large, soft seeds like pea.) We planted both soaked and dry seeds, alternating every other one, to see if the soaking really makes a difference. We marked the two different types with stakes. We figured that, by planting every other seed rather than in bunches, we would account for any differences in sun or soil. You can see that the soaked seeds are much plumper than the others.

Let me know if you’re growing, too, and we’ll enjoy the contest, the tradition, and our spring pea harvests.

Until then, wishful thinking from a previous year’s pea yield:

Photos: Susan Sachs Lipman

Related Posts Plugin for WordPress, Blogger...