Category Archives: Design

Mill Valley’s Life-Size Gingerbread House

I came upon this whimsical house, nestled in the forested Cascade Canyon section of Mill Valley, right behind the library. It’s so sweet and imaginative, and captures the playful aspect of the season. Plus, its setting couldn’t be more perfect.

Photos: Susan Sachs Lipman

Great Marin Holiday Light Displays, Part 2

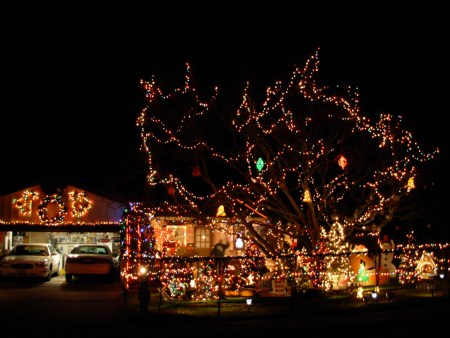
Holiday light displays seem contagious among neighborhoods — I truly think this occurs more from the spread of cheer than a ruthless electrical competition. Really, who can resist a bit of joy when encountering twinkling lights, moving characters, and various expressions of cheer and calm? Marinwood, in Marin County, CA, is one such decorated neighborhood and has apparently been for more than a generation. We drove around there last week, taking in all the fun lights and decorations gracing the various homes. We visited our old favorites, which, as always, stood out.

The Lights of the Valley web site has directions and hours for these houses, plus tons of photos and directions for houses all over Northern California. Do yourself a favor and visit.

Yesterday, I wrote about the fantastic Rombeiro House in Novato, which you can actually go in!

Mize’s Mickey Mouse House, 417 Blackstone Drive, Marinwood

This super-fun house has been going for 33 years. In addition to all the lights and characters decorating the outside, a two-car garage is windowed off and filled to the brim with all manner of Disney toys and characters, in Christmas dress and settings. Particularly prominent is Mickey Mouse, down to the house’s mouse-ear-shaped shrubbery. It is all quite a delight, a fantasy toyland. Smiling visitors of all ages just try to take it all in.

The Nisja Bear House, 383 Quietwood Drive, Marinwood

This delightful house also features diorama displays, but its real crown is the elaborate model railroad that runs through the front yard. Whimsical pieces seem to be added on every year. This year, we had the pleasure of talking to Roy Nisja, who explained how he started decorating the house and building the railroad 29 years ago, when his son was small. His son and family live nearby, but they all continue to build the train each year on Quietwood.

Nisja showed us the camera he rigged so that when he does take breaks and go back inside the house he can still be certain both Eastbound and Westbound trains are running. Chuckling, he pointed out the new lighted landing strip he added on his roof for Santa. People, aged from children to seniors, in Santa hats and warm coats, came up his walk to marvel at the trains, bears, and other snow creatures and characters and wonder which had been added this year.

The Statham Christmas House, 12 Adobestone Court, Marinwood

Luckily, we did talk to Roy Nisja, because he told us about a traditional, wonderful decorated house that we didn’t know about and that had been resurrected after 12 dark years. The Statham House was a 40-year Marinwood tradition until Charles “Dooley” Statham decided to call it quits for health reasons year ago. Sadly, he died this fall, and his family decided to resurrect the house one more time in his honor. It’s an amazing sight to come upon, walking up the hill from Blackstone. (The Court, a little cul-de-sac, is blocked to cars.)

It’s completely magical, with large wooden cut-outs and wonderful lights. We got there close to 11 p.m. (!) Crowds had still been milling about the other houses, but lights were beginning to rather dramatically click off and dim. We did get to see the house in its glory, including some lighted displays of vintage toys in large windows, and hope to again before it’s gone for good in a few days.

The Marin Mommies web site has directions and hours, as well as some more nice material about Statham and the house.

See also Mill Valley’s Real Life Gingerbread House

See also Great Marin Holiday Light Displays, Part 1

Photos: Susan Sachs Lipman

Green Holiday Gift Wrapping

All this talk of green holiday gifts got me thinking about the wrapping. As an admitted packrat, I’m loathe to throw away gift wrapping anyway, especially papers with pretty patterns or textures. And, if opened and stored carefully enough, the paper can usually be reused. (I know there are those who advocate for the joy of tearing open the wrapping. I get it, but I’m just not one of those.)

But there are alternative wrapping ideas worth exploring, and with so many people yearning to reduce, reuse and recycle, there are more options to choose from than ever. If you have a large present, this can also simplify your wrapping efforts, leaving you more time to enjoy other activities than trying to figure out how to stuff a down vest into a box, where to get a big enough roll of wrapping paper to cover it, and how to make the whole thing look festive, instead of formless.

Plus, according to earth911 and other groups, as much as half of the 85 million tons of paper products Americans consume every year goes toward packaging, wrapping and decorating goods. Wrapping paper and shopping bags alone account for about 4 million tons of trash annually in the U.S., and the vast majority of that is generated during the holiday season.


The Japanese have long been fans of wrapping gifts in cloths known as furoshiki. Presents are wrapped in lovely fabrics, ranging from traditional Japanese fabrics and designs to silk, cotton and designs that are modern and retro, all of which can be used over and over. The wrappings and decorations themselves can also be quite elaborate and pretty. This method requires no cutting, only wrapping and knotting, so that it is also practical and sturdy. You may have scrap fabric you can wrap with at home. This Furoshiki site has lots of great fabrics to choose from, in a variety of prices, including fabrics by San Francisco design studio, Chewing the Cud.

This video provides a fantastic Furoshiki tutuorial (thank you to Recycle Now). Once you learn this technique, it’s very easy to do. (Click on “Furoshiki gift wrapping”):

Furoshiki gift wrapping from RecycleNow on Vimeo.

My friend, Molly, at The Fabric Society, also offers wonderful inspiration, tips and fabric for wrapping with furoshiki. She also recently posted this lovely piece about Slow Textiles in general, which is not to be missed. It really sums up the role fabric plays in our history, sustainability, community and beauty.

If you don’t want to go the wrapping route, there’s still time in this holiday season to buy (or perhaps even make) reusable bags. These fabric bags from Lucky Crow are super-cute and come in a wide variety of styles and sizes. They really solve the problem of wanting to use recyclable wrapping materials, without going the route of a grocery-supplied bag. They work for party favors, too. The Portland, OR-based company also sells its bags in stores. Check their web site for details.

On the paper front, Sunday comics from the newspaper make a colorful, distinct, recycled and recyclable wrapping. Recycled wrapping papers can be found in many stores. Gift tags can be homemade from construction paper and stickers/stamps/drawings, or from recycled holiday cards from years past — if you’re a packrat (I mean recycler) like me, you’ll have those on hand.

Photos: Kelvin Kay, Katorisi, Lucky Crow

Let Nature Decorate your Holiday Table

Nature often makes the best decoration. Especially in Fall, leaves, fruits and nuts are readily available in public spaces, in addition to being eye-catching, pretty, and free or nearly so.

Of course, the hunt is a highlight of the pre-planning. It provides a fun family tradition, and a way to enjoy nature together in the beautiful Fall, before bringing some of it inside for lovely — and free — table decor. My favorite tabletop finds include buckeyes, chestnuts, multi-colored leaves, ivy, pine boughs, pine cones, branches with berries and, from the store, mini pumpkins, persimmons, apples, mandarin oranges, and pears.

Above are fall tables from two different years. Both feature collected items from nature and inexpensive store-bought fall flowers that my family and I arranged in a shallow bowl, using a “frog” to hold the stems in place. All of our glassware and china has been handed down, including the festive red glasses. I layered inexpensive tablecloths and fabric runners.

One Thanksgiving morning, our cousins gathered branches and boughs for their table and made cute homemade placecards for each guest.

Another guest provided this very festive and yummy cake. I made the Cranberry Crunch squares from Susan Simon’s The Nantucket Holiday Table. They’re very good, and a great use for cranberries.

If you’re fortunate to be able to collect buckeyes, chestnuts or acorns in your area, they can make an inexpensive, natural, interesting filler for a large vase of flowers.

Friend Mary Mauro cleverly filled a very tall vase with mini pumpkins for a gathering. (She is also a gifted flower arranger.)

I hope you have an inspired, happy Thanksgiving.

Photos by Susan Sachs Lipman

Make a Fall Leaf Placemat

fallleaf3

fallplacemat2

fallplacemat5

This is a fun, easy, rewarding project for those who still have leaves falling, or on the ground. Or perhaps you’ve collected some and you’re not sure what to do with them. Making a placemat will allow you to enjoy them for years to come. Even small children can be involved in this project by gathering leaves and helping with the design. You’ll need:

Iron-on flexible vinyl, available in fabric stores by the roll. It is made by Heat’n Bond or Therm O Web.

Medium-weight white cotton fabric, about 3/4 yard per placemat.

Your favorite Fall leaves.

A phone directory or other heavy book.

falltree5

1. Gather some wonderful, colorful leaves that have fallen.

fallleaf4

2. Place them in a phone directory, or other thick book to flatten them. Put them toward the back of the book, so there will be enough pages over them to press them. Make sure you leave space between the leaves, and space between leaves and the book’s fold. Leaves will be flat in a couple of days.

leafplacematbook

3. Cut fabric rectangles, 2 inches larger all around than you want your final placemat to be. I cut my fabric into 20″x 13″ pieces, to make 18″ x 11″ placemats. For the exact shape, I traced the outline of an existing placemat, which had rounded edges. Turn the fabric pieces over and make occasional guide marks 2″ around from the outside edges, lightly with a pencil.

4. Turn the fabric right-side-up again and play with the placement of the leaves. When you are happy with the way they look, you will be ready to iron the vinyl down. Don’t forget to leave more than a 2″ space all around your design.

leafplacemat5

5. Heat your iron. Peel the backing off the vinyl and place it sticky-side-down onto the leaves. Smooth the vinyl with your hands, then iron it onto the fabric, following package directions.

6. When the fabric is cool, turn over and cut according to your guidelines. For further sturdiness, you can iron vinyl onto the back of the placemat as well. Admire and use your placemats for years to come.

fallplacemat6

fallplacemat3

fallplacemat4

Photos by Susan Sachs Lipman

Calling all Plush Fans and Crafters: Plush Show at Schmancy in Seattle

A few years ago, my family and I found ourselves in Seattle and at a wonderful, whimsical store called Schmancy, in the Belltown district, that specializes in all things plush, most of which are hand-made. Shelves were lined with plush cupcakes, benign monsters, felt woodland mushrooms, large-eyed sandwiches, and storybook elves, many of which took their fun sensibility from Japanese art and design.

My daughter has always loved to sew and to make whimsical plush objects (in addition to her own eco-friendly totebags.) She struck up a conversation with Schmancy owner and artist, Kristen Rask, and she ended up having this abstract applique- designed piece in the store’s annual Plush Show.

schmancy

The Plush Show is happening again, with receptions and activities  this weekend and displays throughout the month. In addition, the Northwest Film Forum will be screening Faythe Levine’s film, Handmade Nation. This documentary about the D.I.Y. craft movement will be appearing in other cities; check the film’s website for details.

If you’re crafting at home, there’s plenty of inspiration and instruction available. Kristen Rask’s own book is called Plush You! Loveable Misfit Toys to Sew and Stuff. Another book my daughter Anna has really enjoyed is Softies: Simple Instructions for 25 Plush Pals by Therese Laskey. A bonus of plush-toy crafting is that it can often be done with felt. Felt is so tactile and pleasing to work with. Handmade felt is great but, for children and others wishing to experiment, bright squares and pieces of felt are relatively inexpensive, as well as easy to use.

Another cute fabric-crafting book I recently came across is Betz White’s Sewing Green: 25 Projects Made with Repurposed & Organic Materials. Not strictly oriented to plush, this book has lots of cute ideas for easy, green D.I.Y. sewing projects like sweet pillowcase dresses, mans-shirt aprons, screen printing, a fall-leaf felt scarf, and more.

Be warned: a visit to Schmancy or a poke into one of these books will make you want to start crafting every cute thing inside.

plush you

Top Photo by Susan Sachs Lipman

Walt Disney Family Museum Opens Today in San Francisco

disneystatue

As if by Disney magic, an army barracks and adjoining buildings in San Francisco’s formerly military Presidio have been transformed into The Walt Disney Family Museum, which opens today. Visitors can travel through 10 galleries and a theater and see early sketches that became the characters we know and love today, ton of animated movie clips, family home movies and reminiscences, vintage Disney toys, 3-D models, a two-story-high animation camera that was used to create 3-D effects for the movies, Fantasia and Pinocchio, and a model of the original plans for Disneyland.

disneyentrance

Also featured is Mary Blair’s beautiful artwork for Peter Pan. Mary Blair was an extremely talented painter and colorist who worked closely with Walt Disney, designing many of the evocative technicolor backgrounds for his movies. She also did the character and art design for my favorite Disneyland ride, It’s a Small World.

disneysmallworld

The museum provides an insight into the craft of animation, as well as Walt Disney as a person. One of the reasons for constructing the museum, Disney’s daughter Diane Disney Miller has said, is that as time has gone on since Walt Disney’s death in 1966, fewer and fewer children had any idea that there was a person behind the ubiquitous Disney corporate logo.

Disney was indeed quite playful and an extraordinary visionary. He so altered the fields of animation and theme parks that someone who was born in an era during which both are plentiful could easily take his achievements for granted.

disneymatterhorn

Disney retained a sense of joy and awe of his craft. The museum features an early Alice in Wonderland film in which Alice visits an animation studio and falls into a wonderfully animated dream state. Also featured are clips and items from the early movies that altered animation history long before the 1990s animation wave hit: Snow White and the Seven Dwarfs, Bambi, Dumbo, Sleeping Beauty, and Fantasia.

Having been fortunate to have had regular pilgrimages to Disneyland as a child, and now with my family, I am looking forward to seeing the museum’s history of the park. At every stage of life, as corny as it may sound, I still find it “The Happiest Place on Earth” and have no doubt that a visit to the Walt Disney Family Museum will be similarly filled with imagination and mirth.

disneycar

Photos by Susan Sachs Lipman

Loom and Finger Weaving

MeestersSoft_Stool

Discovering and writing about Jo Meesters‘ wonderful loom-inspired furniture pieces made me want to post instructions to help you discover or rediscover loom weaving. As a kid, I made a ton of potholders on a simple loom. I was fascinated by the infinite possibilities of pattern and color. (And many a relative received a potholder gift.)

potholders2

You don’t have to stop at the potholder, of course. The woven squares can be sewn together to make quilts, rugs, placemats, purses, tissue box covers, book covers, or doll sleeping bags and blankets.

To make a potholder, simply begin fastening the loops across the loom by hooking them around a peg at each end. Once you have a solid surface of loops running in one direction on the loom (and running evenly between pegs), you can begin to weave the second set of loops across the first, by pulling them alternately over and under each existing loop, either with your fingers or with the tool that comes in loom kits. The second set of loops should alternate their over-under patterns, so that the weave is even. Play with color combinations. You can create anything, from a solid block of color to a neat checked pattern to a completely random design.

To finish the potholder, begin at the start of a row. Take the first loop off its peg, then do the same with the second loop. Now put the first loop around the second and pull the second loop through the circle. Now the second loop is sticking up. Take the third loop off its peg and put the second loop around it and pull the third loop through the circle. Now the third loop is sticking up. Proceed around the potholder. The edge should lay nicely around it like a braid. You’ll have one loop left, and that will be the hook for hanging the potholder.

I recommend cotton loops, for their nice texture and colors. Wool is also great.

HD-potholder

Here are some resources for loom and loop materials:

Harrisville Designs, in New Hampshire, has a great selection of cotton loops in all kinds of exciting colors that you can buy individually. The store specializes in yarn, weaving, and other fiber crafts.

The Woolery features individual loop colors from Harrisville, as well as lots of kids’ weaving and felting supplies.

Live and Learn offers a sturdy metal loom, bags of assorted colorful cotton and wool loops, and lots of bags of loops in individual colors.

Magic Cabin has a loom-and-cotton-loop set at a good price.

Fingerweave1

Every year, at our annual Girl Scout Camporee weekend, one craft activity proved exceptionally popular with a variety of girls: Finger Weaving. This simple, tactile craft occupied girls of all ages, who wove, chatted, and relaxed in nature. Some of the resulting strands were so long, they became unique fashion accessories. Even though I like to make potholders with traditional cotton loops, the newer, stretchier nylon loops are the best for finger weaving. (It will still work with cotton loops, but some may not be stretchy enough.)

Detailed instructions for finger weaving are here.

Jo-Ann Fabric is a good source for nylon loops.

fingerweaving2

Fingerweaveheart

Photo by Jo Meesters (Stool)

Photos by Harrisville Designs (Potholders)

Additional Photos by Susan Sachs Lipman

Jo Meesters’ Sustainable Furniture

MeestersFinal_odds

I did a doubletake when I first saw a picture of Jo Meesters’ adorable furniture for his Netherlands design studio, TESTLAB. Yes, it did — It looked just like the potholders I made as a kid, using cotton loops strung and woven on a small square loom. I loved the potholders’ colors and patterns, and made oodles of them. Nothing else seemed to have quite the same appearance of weave and texture. Until now.

Meesters’ furniture collection, “Odds & Ends, Bits & Pieces”, uses only recycled material — 34 discarded wooden beams and 16 leftover blankets goes into each four-piece set.

This stool looks so soft and appealing.

MeestersSoft_Stool

The studio explores the intersection of craftsmanship and mass production. Many of the forms are elemental. Sustainability, innovation and good design are guiding principles, as is the transformation that is possible when one considers or uses something in a new way.

The “My Secret Garden” carpet, which was done in 2005 in collaboration with Marije van der Park for Meesters & Van der Park, is made from discarded woolen blankets. Traditional needlework and floral patterns lend it extra charm.

Meestersmy_secret_garden2

This woodwork-inspired table, “Reshaping Wood”, was also created in 2005 in collaboration with Marije van der Park for Meesters & Van der Park. The project explored the intersection of traditional woodwork and cutting-edge water jet technology in its fabrication.

Meestersreshaping_wood1

I find Meesters’ work incredibly inspiring, for its beauty and obvious love of craftsmanship and for its care and creativity in regards to re-use of everyday materials. Indeed, one of Meesters’ stated goals is to create a bond between object and user, to imbue his projects with an emotional value. If all that weren’t enough, Testlab and Meesters’ creations are just plain fun.

Photos by Marielle Leenders for Jo Meesters (Collection, Stool)

Photos by Jo Meesters (Carpet, Table)

Make this Easy Tie Dye Project

Before Anna left for camp, she wanted to dye some solid shirts for “color wars” and she wanted to do some tie dying. What to dye? A plain laundry bag, from San Rafael, CA’s Dharma Trading Company — a great resource for all things fabric, dye and yarn that also does mail order — was just the thing. The all-natural bag was inexpensive and fun to dye and, as a bonus, we knew it wouldn’t get confused with others in the camp cabin.

After getting our supplies together — buckets of water for each dye color, rubber gloves, rubber bands, trash bags to line our deck, dye packets and sticks to stir the dye — we began by folding the laundry bag accordion-style.

To do that: Make a narrow fold from the bottom of your item up. Turn the item completely over so the fold is now at the top, facing down. Make another narrow fold the other way. Continue until your item is completely folded.

Once we did that, we tied rubber bands in the places where we didn’t want the dye to come through.

dye2

We began to create our dyes. We used the pure colors from Jacquard, called iDye. They’re wonderfully bright and extremely easy to use. We’ve dyed solid items in the washing machine, with great results. It was nice to find that it works equally well in buckets for tie-dying. You just drop the dye packet in the water (the hotter the better), add salt, and stir well.

dye4

dye3

Anna started dipping the various segments of the laundry bag into the different dyes. She tried to hold each there a long time to get the richest possible colors.

dye7

dye9

dye10

We were really pleased with the way the colors were coming out.

dye8

dye11

This is the finished laundry bag. Anna really liked it. If you find that you want more color and less white space, experiment with the accordion folds on a small piece of fabric. Making the folds narrower and looser will allow more dye to get in.

dye12

There are a lot more projects on the Jacquard site, so you can start having fun dyeing. Bandannas are great to dye, as their small surface allows you to experiment. As long as we had our buckets of color, we dyed some shirts and even underwear. We left the fabric in the dye a full day and got great, saturated colors. (Anna reported back from camp that her color war color was yellow, so she was all set.)

Photos by Susan Sachs Lipman

Related Posts Plugin for WordPress, Blogger...